Since version 5.2, WordPress development team added new feature to their core called Site Health. The main goal of the feature is improving quality, performance and security of your websites and plugins. And nowadays every website owner and developers whom using cms WordPress having a great possibility to investigate and use such a great features provided by that tool.
In the article we will discuss about tips and tricks on how to achieve 100% score according to site health score system, will break the most common myths regarding to this tool, will find causes of occurrence and ways to fix few most common critical issues.
Site health, 100% check score guide for WordPress 5.2+:
- What is the WordPress Site Health tool?
- Site Health Status Tab
- Site Health Info Tab
- Choose the right WordPress hosting
- Use the latest database version
- Use the latest version of PHP
- Make sure that all required PHP modules are persist
- Install SSL certificate and enable HTTPS
- Disable WordPress debug mode
- Keep WordPress up to date
- Keep themes and plugins up to date
- Remove unused themes and plugins
- Keep rest API enabled
- Make sure WP Cron is enabled
- Keep WordPress automatic updates enabled
- Is the site health score affect on SEO rank?
- Do I need to get 100% WordPress site health score?
1. What is the WordPress Site Health tool?
Site health tool itself is a collections of tests that allows you to identify potential issues and shows some extra debug information about your WordPress site and server configuration.

You can find the tool in the WordPress admin area, under the Tools menu -> Site Health. There you can find 2 special pages which will display all the necessary information about the current issues and performance of your website.
2. Site Health Status Tab
The first page called Status runs a series of tests on your site and provide results in the form of categorized lists divided into sections according to status levels below:
- Critical issues – significant issues are found on your website and must be fixed immediately
- Recommended improvements – this is just advice, according to which you may increase your website performance or security level
- No issues detected – test is passed successfully
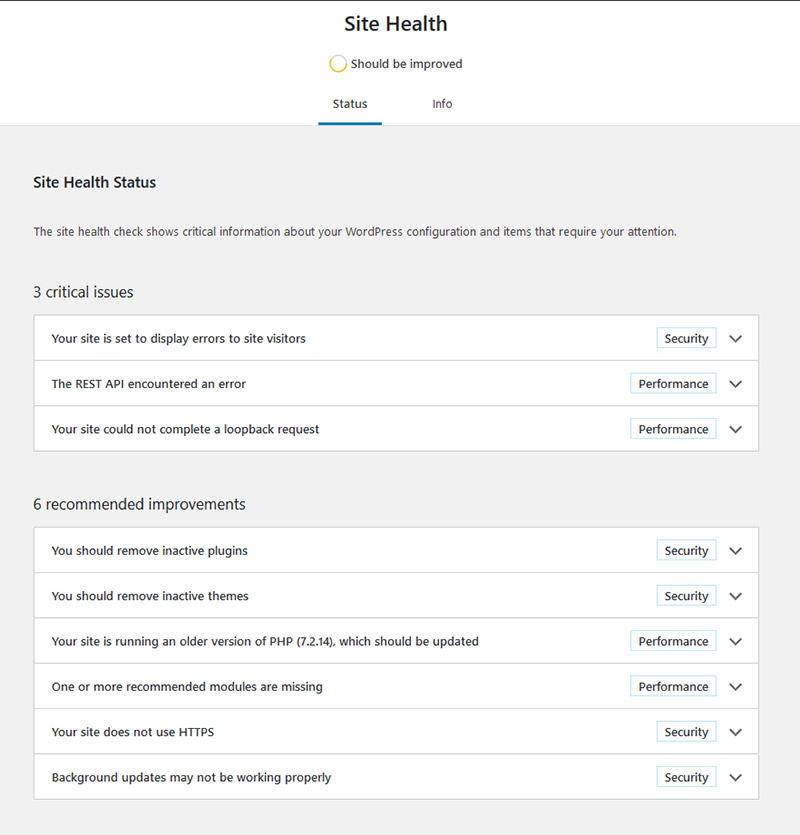
The result of each test contains title briefly describing the problem and label helping you to categorize what is affected by the issue. Each list item can be expanded to show a detailed description of the problem and recommendations with action links leading to appropriate management areas on your dashboard.
3. Site Health Info Tab
The Info page is using for debugging purposes. It provides a lot of information about the site and server configuration in the form of the list with expandable items.
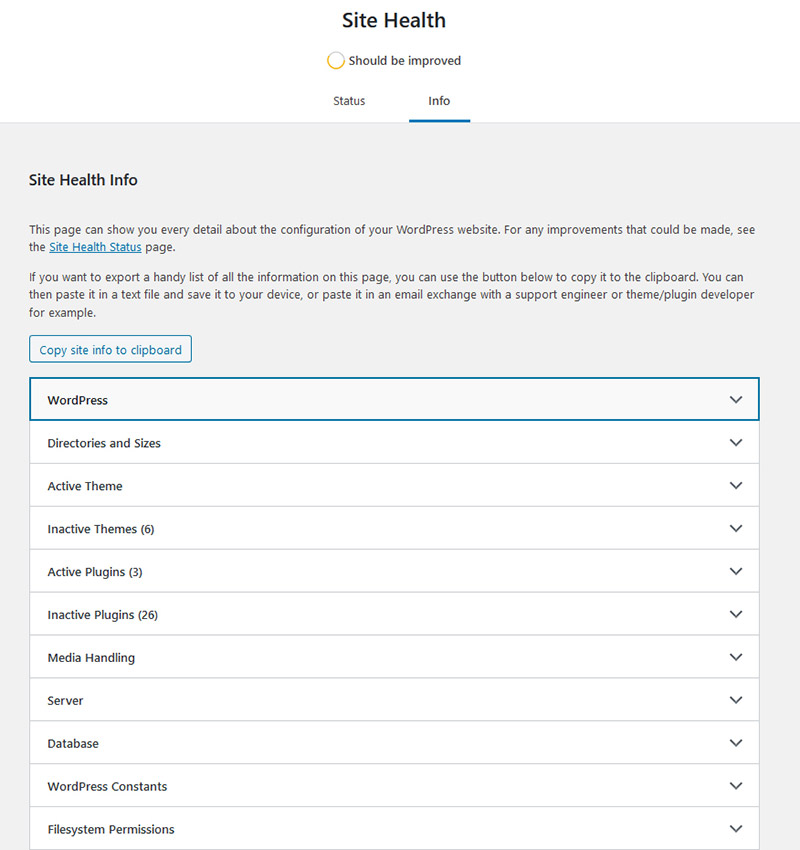
There you can find next information:
- WordPress – represent basic information about your website such as cms version, site language, timezone, permalink structure, etc.
- Directories and Sizes – provides server path and sizes for most common directories within your website such as WordPress directory (place where site installed), upload directory, themes and plugins directories
- Active Theme – shows all information about active theme such as name, author, directory location, etc.
- Inactive Theme – provides list of names and versions for inactive themes installed on your website
- Active Plugins – display a list of active plugins with extra information.
- Inactive Plugins – list of inactive plugins
- Media Handling – provides supportive information about Active editor, ImageMagick, GD and Ghostscript version
- Server – display information about your server configuration such as Server architecture, PHP version, PHP max input variables, PHP time limit, PHP memory limit, Max input time, Upload max filesize, PHP post max size, cURL version and more.
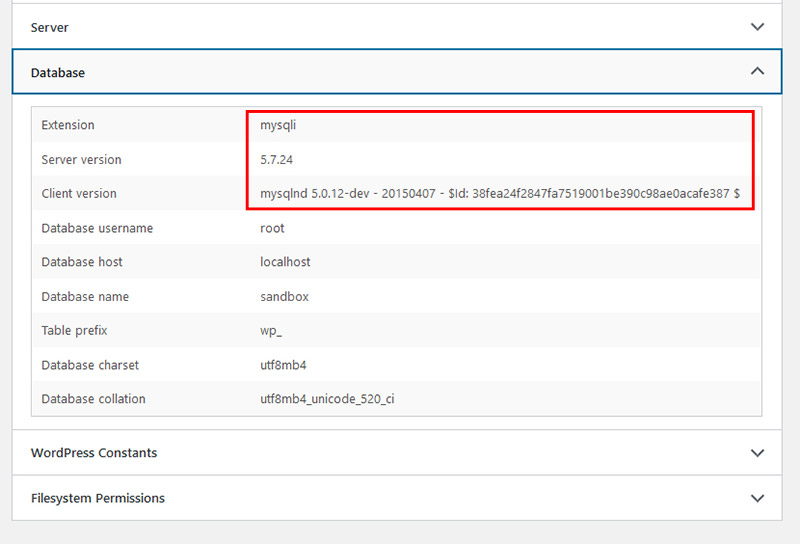
- Database – represent all database related things like Extension, Client version, Database username, Database host, Database name, Table prefix, Database charset, Database collation, etc.
- WordPress Constants – list of available wordpress constants such as ABSPATH, WP_HOME, WP_SITEURL, WP_CONTENT_DIR, WP_PLUGIN_DIR, WP_MAX_MEMORY_LIMIT, WP_DEBUG, WP_DEBUG_DISPLAY, WP_DEBUG_LOG, SCRIPT_DEBUG, WP_CACHE, CONCATENATE_SCRIPTS, COMPRESS_SCRIPTS, COMPRESS_CSS, WP_LOCAL_DEV, DB_CHARSET, DB_COLLATE
- Filesystem Permissions – show list of directories and their writable status
At the top of the page, there is a really useful button “Copy site info to clipboard” allowing you to copy all the data to the clipboard and send it to hosting support or to your developers, who help you maintain your site.
4. Choose the right WordPress hosting
One of the most important things it’s choosing the right web hosting for your website. Choosing the right one can improve your SEO score and increase sales.
Whichever host you’d like to choose always keep in mind few most important things about WordPress hosting:
- Load time – or speed in another way to saying it, this factor having affect on SEO rank of your site
- Uptime – is the amount of time that a server has staying up and running
- Customer Support – good support always helps you to resolve different issues and provide with best advice and guidance on their products.
- Features availability – more features may allow you to tune up your website to rocket speed, improve performance and increase security level.
- Security – if you seriously planning to work with your clients or provide any digital service through your site. Webhosting security become one of the important things which you must take into account to protect your business data
- Potential of growth – if you planning to grow your business or users flow always take into account scalability of your web hosting, it may save you a ton of time, nerves and money
- Price and general feedback – this thing almost always helps to separate the real winner from the sinking ship. Check polls, read reviews and find your own winner.
We can recommend you few WordPress hosting providers
5. Use latest database version
WordPress is using relational database management system (RDMS) to store all of your website data such as posts, pages, comments and options. There are two types of database management software mainly used by WordPress:
- MySQL
- MariaDB (it’s a fork of MySQL)
To improve your website’s performance and security you obviously need to make sure that it’s using the latest version of MySQL 5.6+ or MariaDB 10.1+ according to recommended WordPress requirements.
You can check the current version of database installed on your hosting under Site Health -> Info tab -> Database
If for some reason you will find that your site is running on older database version, contact with your hosting provider and ask to update it to the latest stable version. Or consider ways of changing your hosting provider. By the way we recommended a few excellent WordPress hosting providers above.
6. Use the latest version of PHP
WordPress is built and maintained with PHP programming language. Using the latest version of PHP allows your website to become more secure and get a big boost in speed and performance.

According to the requirements of WordPress minimum recommended version of PHP is 7.3+
You can find and check current version of PHP under Site Health -> Info tab -> Server
If your website health check provides the next recommendation message: “Your site is running an older version of PHP “, then you definitely need to update your PHP version.
Always keep in mind, before you start moving to the latest PHP version, a good thing you need to do is to check the compatibility of installed themes and plugins with the newest version of PHP. In the case, PHP Compatibility Checker plugin will help you to find outdated elements and compatibility issues on your website.
After you have fixed all the compatibility issues, updated or deactivated unnecessary plugins, you can proceed to upgrading of PHP version on your hosting.
7. Make sure that all required PHP modules are persist
PHP extensions are compiled libraries usually written in C and then compiled to machine code. Main purposes of them is to extend PHP functionality for some very particular usage and increase performance of programming language.
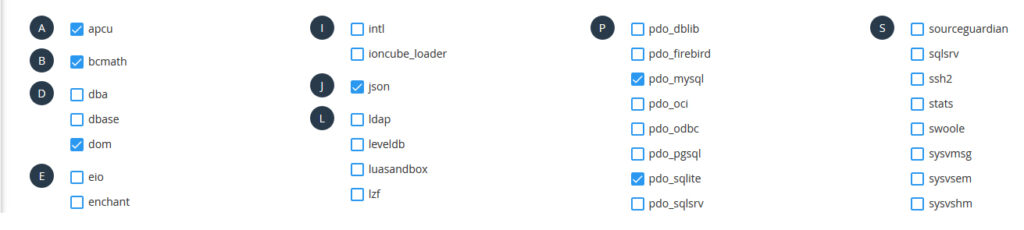
WordPress score has its own list of required PHP extensions which helps to provide the best performance. In the case, if WordPress didn’t find the required extension it will do more job to get around the task, which may cause that your website may become much slower or less secure.
If on the site health page you will get a similar message: “One or more recommended modules are missing”. You need to do the following things:
- Expand debug information and find the name of the missing module inside.
- Then you need to go to your hosting management panel and enable the required module.
If for some reason you can’t do the above steps, contact your hosting provider and ask to enable required extensions.
8. Install SSL certificate and enable HTTPS
HTTPS or Hypertext Transfer Protocol Secure encrypting HTTP requests communication between your browser and server, so that data you’re sending to or receiving can’t be intercepted or tampered by attackers.
Most modern browsers require HTTPS to support new features such as taking pictures or recording audio, enabling geolocation or push notifications, supporting the service workers which is needed to run progressive web applications.
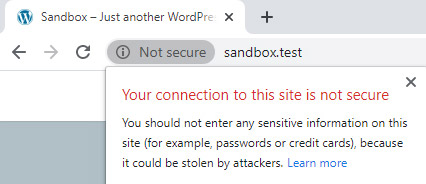
Since August 6, 2014 Google started to interpret availability of HTTPS as ranking signal within their searching algorithm. In addition since October 2017, to Chrome v 62 added feature which marked websites without HTTPS with “Not Secure” status.
If during the site health check you will get the next recommendation message: “Your site does not use HTTPS” then you need to enable HTTPS by installing an SSL certificate on your website.
To switch your website from HTTP to HTTPS you need to install an SSL certificate on your website. Nowadays most good hosting providers allow you to buy a cheap SSL certificate or even giving it for free as a part of hosting packages.
9. Disable WordPress debug mode
WordPress comes with built in debug system which includes various tools. Usually, it’s using by developers on staging versions of websites to gather more details about code quality and errors within your theme, plugins and any custom pieces of code added to improve your website features.
On public websites debug mode always must be turned off, through an outdated plugin or theme, non-standard user behavior, or just forgotten by developer piece of code may affect in displaying sensitive information from your database or just breaking your website.
To enable or disable Debug Mode on your website you must go to root folder of your website and find the next file wp-config.php. At the bottom of the file before words ” /* That’s all, stop editing! Happy blogging. */ “ you need to insert below piece of code:
define('WP_DEBUG', false); - will disable Debug Mode
define('WP_DEBUG', true); - will enable Debug Mode
10. Keep WordPress up to date
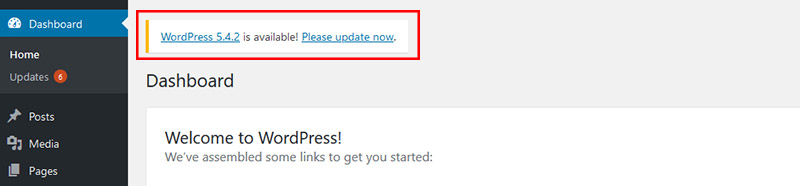
Make sure that your website using the latest available version of WordPress. Usually, each WordPress release provides new useful features, bug fixes and security patches, which aiming to help you to get strong protection against hacker attacks and various hacking attempts.
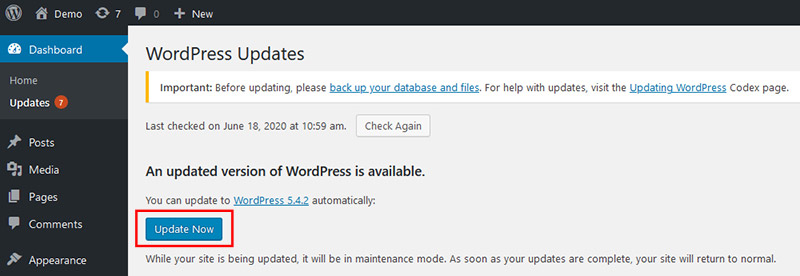
When the new version appears, you will see a notification in the upper left corner of your admin panel. In the case, you need just to make one button click to update your WordPress to the newest one.
11. Keep themes and plugins up to date
There is few reasons why you should always keep your themes and plugins up to date: security, compatibility and feature availability.
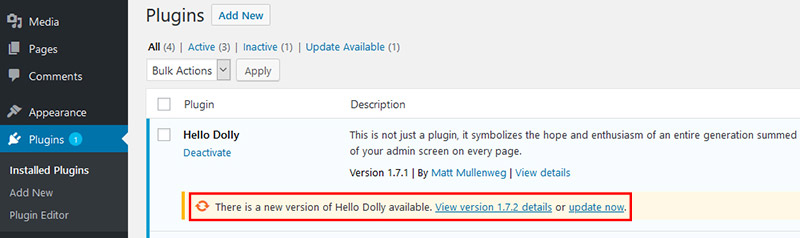
Hackers always searching for new vulnerabilities and ways to attack websites build with WordPress. Good plugin and themes developers always release updates containing security patches and bug fixes for the known issues, which may help your website to stay protected against hackers attacks.
WordPress team makes updates releases of their cms really often, if over a long time you will keeping your themes and plugins outdated, you can run into a problem through compatibility issues through outdated code.
Another reason for keeping your themes and plugins up to date is possibility to get new features implemented by developers, which may boost your website performance and make your site more appealing for users.
12. Remove unused themes and plugins
Inactive outdated themes and plugins can become a source of website vulnerabilities.
If site health check shows to you next message: “You should remove inactive plugins” or “You should remove inactive themes” then you should expand debug messages by following the recommended links delete appropriate elements
There is only one exception, WordPress team recommends you to leave the latest default theme installed, even if you’re not using it.
13. Keep Rest API enabled
REST is an acronym meaning Representational State Transfer – is an architectural approach providing specific standard designed to allow different applications like web, mobile or desktop to communicate with each other.
According to WordPress instructions for developers, highly not recommended to disable REST API, because it may break your WordPress website admin functionality.
For example, it may affect on the block editor screen which helps you to display and save your posts and pages. Or it may break communication between your website and one of the installed plugins functionality relying on REST API.
To get prefect Site Health score, you definitely need to leave the WP REST API enabled.
If site health check reports show you next issue: “The REST API did not behave correctly “ then your REST API is disabled. To enable the API you need to check all active plugins and themes (by disabling them one by one) to find which one disabling the REST API.
14. Make sure WP Cron is enabled
WP Cron is a WordPress feature that allows to handle scheduling time-based tasks such as publishing scheduled posts, checking for available updates, creating scheduled backups, etc.
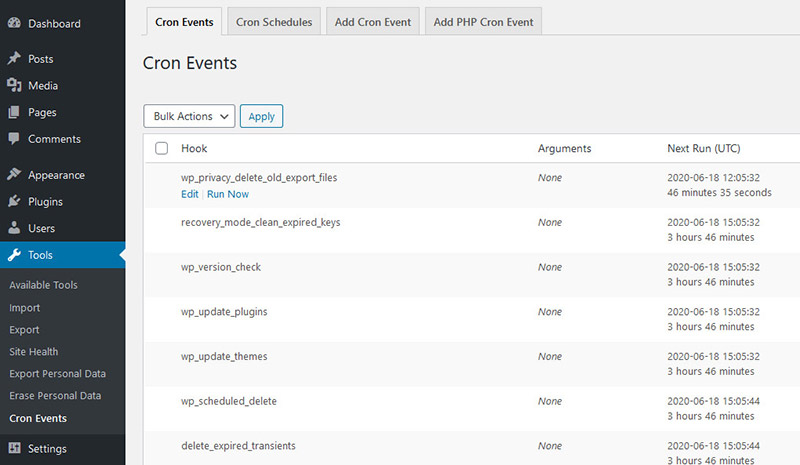
Usually all scheduled tasks are put into a queue and on each page load WP-Cron is checking them to see what needs to be run.
You can use WP Crontrol plugin to make sure your WP Cron is working correctly and to see a list of scheduled tasks on your website. By the way excessive use of cron tasks may affect on your website speed and performance.
If during site health you will see the next message: “A scheduled event is late”. This will mean that WP Cron is disabled on your website.
First of all go to the root folder of your website and open next file wp-config.php, then locate the following line of code, if there is any
define('DISABLE_WP_CRON', true); - to disable WP Cron
define('DISABLE_WP_CRON', false); - to enable WP Cron
15. Keep WordPress automatic updates enabled
Since WordPress 3.7 was added new feature – automatic background updates, which allow your website to communicate with the central wordpress.org directory to receive minor core and translation releases in background mode.
Website owners always have the possibility to choose whether to keep this feature enabled or not. Basically, disabling of automatic updates is not recommended, but in a few cases you may want to hold off on updates
- If you’ve added some custom piece of code to your WordPress core. In this case, any automatic updates may override or reset your code and cause issues with your website extra functionality.
- If you are using any custom WordPress theme or plugin, updating may cause unpredictable bugs and losing some features.
To manually disable automatic updates for WordPress all you have to do is add the following line of code to your wp-config.php file:
define( 'WP_AUTO_UPDATE_CORE', false );You still will be available to get notices when there is a new version available.
16. Is site health score affect on SEO rank?
Summing up all the above information, the answer is YES – if you have a “Good” site health score then you definitely improving your chances to get higher steps in Google rank. But if site health tool tells you something like “Should be improved” then you need to check the recommendations above and improve your website where it’s needed.
17. Do I need to get 100% WordPress site health score?
In this case, it all depends on your desire. “Good” status of site health score is not required for the normal functioning of the blog, you just need to make sure that all critical issues are fixed and don’t forget about the recommended hosting environments above.


Even though this article was written back in 2020, the content, tips and tricks on how to improve your WordPress site health score, speed and perfromance are still applicable to current WordPress version 6.1.1. WordPress continues to be an amazing platform to use. Good post. Thanks for sharing.